首先来区别一下拦截器与过滤器, 从原理上来说,这两者实质是一样的,但是有前提,所有的j2ee项目都可以使用过滤器,只有struts项目才能使用拦截器,因为他们属于不同的API.
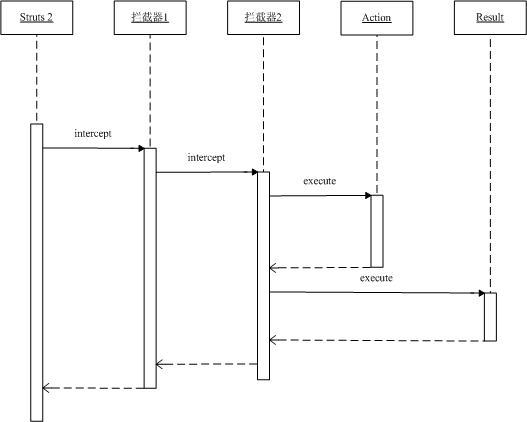
Struts 2的拦截器实现相对简单。当请求到达Struts 2的ServletDispatcher时,Struts 2会查找配置文件,并根据其配置实例化相对的拦截器对象,然后串成一个列表(list),最后一个一个地调用列表中的拦截器,如图1所示。
 图1拦截器调用序列图
已有的拦截器
Struts 2已经为您提供丰富多样的,功能齐全的拦截器实现。大家可以到struts2-all-2.0.1.jar或struts2-core-2.0.1.jar包的struts-default.xml查看关于默认的拦截器与拦截器链的配置。
以下部分就是从struts-default.xml文件摘取的内容:
< interceptor name ="alias" class ="com.opensymphony.xwork2.interceptor.AliasInterceptor" />
< interceptor name ="autowiring" class ="com.opensymphony.xwork2.spring.interceptor.ActionAutowiringInterceptor" />
< interceptor name ="chain" class ="com.opensymphony.xwork2.interceptor.ChainingInterceptor" />
< interceptor name ="conversionError" class ="org.apache.struts2.interceptor.StrutsConversionErrorInterceptor" />
< interceptor name ="createSession" class ="org.apache.struts2.interceptor.CreateSessionInterceptor" />
< interceptor name ="debugging" class ="org.apache.struts2.interceptor.debugging.DebuggingInterceptor" />
< interceptor name ="external-ref" class ="com.opensymphony.xwork2.interceptor.ExternalReferencesInterceptor" />
< interceptor name ="execAndWait" class ="org.apache.struts2.interceptor.ExecuteAndWaitInterceptor" />
< interceptor name ="exception" class ="com.opensymphony.xwork2.interceptor.ExceptionMappingInterceptor" />
< interceptor name ="fileUpload" class ="org.apache.struts2.interceptor.FileUploadInterceptor" />
< interceptor name ="i18n" class ="com.opensymphony.xwork2.interceptor.I18nInterceptor" />
< interceptor name ="logger" class ="com.opensymphony.xwork2.interceptor.LoggingInterceptor" />
< interceptor name ="model-driven" class ="com.opensymphony.xwork2.interceptor.ModelDrivenInterceptor" />
< interceptor name ="scoped-model-driven" class ="com.opensymphony.xwork2.interceptor.ScopedModelDrivenInterceptor" />
< interceptor name ="params" class ="com.opensymphony.xwork2.interceptor.ParametersInterceptor" />
< interceptor name ="prepare" class ="com.opensymphony.xwork2.interceptor.PrepareInterceptor" />
< interceptor name ="static-params" class ="com.opensymphony.xwork2.interceptor.StaticParametersInterceptor" />
< interceptor name ="scope" class ="org.apache.struts2.interceptor.ScopeInterceptor" />
< interceptor name ="servlet-config" class ="org.apache.struts2.interceptor.ServletConfigInterceptor" />
< interceptor name ="sessionAutowiring" class ="org.apache.struts2.spring.interceptor.SessionContextAutowiringInterceptor" />
< interceptor name ="timer" class ="com.opensymphony.xwork2.interceptor.TimerInterceptor" />
< interceptor name ="token" class ="org.apache.struts2.interceptor.TokenInterceptor" />
< interceptor name ="token-session" class ="org.apache.struts2.interceptor.TokenSessionStoreInterceptor" />
< interceptor name ="validation" class ="com.opensymphony.xwork2.validator.ValidationInterceptor" />
< interceptor name ="workflow" class ="com.opensymphony.xwork2.interceptor.DefaultWorkflowInterceptor" />
< interceptor name ="store" class ="org.apache.struts2.interceptor.MessageStoreInterceptor" />
< interceptor name ="checkbox" class ="org.apache.struts2.interceptor.CheckboxInterceptor" />
< interceptor name ="profiling" class ="org.apache.struts2.interceptor.ProfilingActivationInterceptor" />
在此基础上,可以往此栈上加新的内容.配置如下.
<interceptors>
<interceptor name="validate"
class="com.fdy.oa.struts2.interceptor.ValidateLoginInterceptor"></interceptor>
<interceptor-stack name="oaStack">
<interceptor-ref name="defaultStack"></interceptor-ref>
<interceptor-ref name="validate"></interceptor-ref>
</interceptor-stack>
</interceptors>
<default-interceptor-ref name="oaStack"></default-interceptor-ref>
将自定义拦截器配置到栈中.
自定义拦截器的源码;
package com.fdy.oa.struts2.interceptor;
import com.fdy.oa.struts2.action.LoginAction;
import com.opensymphony.xwork2.ActionInvocation;
import com.opensymphony.xwork2.interceptor.Interceptor;
public class ValidateLoginInterceptor implements Interceptor {
/**
*
*/
private static final long serialVersionUID = 1L;
public void destroy() {
}
public void init() {
}
public String intercept(ActionInvocation invocation) throws Exception {
// invocation持有Action引用
Object action = invocation.getAction();
if (action instanceof LoginAction) {
invocation.invoke();
} else {
Object user = invocation.getInvocationContext().getSession().get(
"user");
if (user != null) {
invocation.invoke();
}
}
return "login";
}
}
用户第一次登录时,session被放到了invocation中.
上述代码中invocation判断每一个action的类型,假如是LoginAction的话,就放行而不检查session.如果为其他类型,就要检查其类型.如果session中有值,就继续调用后面的组件,没有值,跳转到登陆界面. 注意上面的'user' ,‘login'都是struts的配置文件中的配置的result的名字.因为struts的filter被配置在了web.xml中,所以所有的请求都会经过这一步,也就对所有请求都进行了验证.
希望各位多加练习,早日成为我这样的前辈高人.哦呵呵呵呵!


 技术讨论
技术讨论