Create Shared Disks
Shut down the RAC1 virtual machine using the following command.
# shutdown -h now
Create a directory on the host system to hold the shared virtual disks.
# mkdir -p /u01/VM/shared
On the VMware Server Console, click the "Edit virtual machine settings" button. On the "Virtual Machine Settings" screen, click the "+ Add" button.
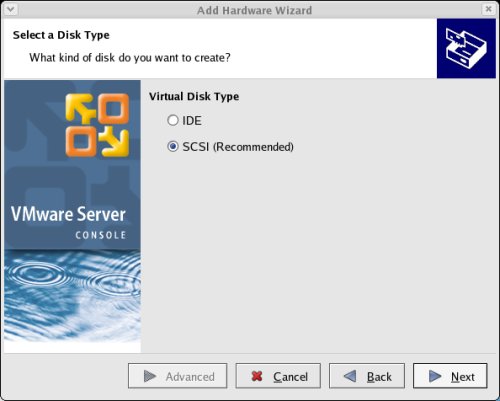
Select the hardware type of "Hard Disk" and click the "Next" button.

Accept the "Create a new virtual disk" option by clicking the "Next" button.

Accept the "SCSI" option by clicking the "Next" button.
Set the disk size to "10.0" GB and uncheck the "Allocate all disk space now" option, then click the "Next" button.

Set the disk name to "/u01/VM/shared/ocr.vmdk" and click the "Advanced" button.
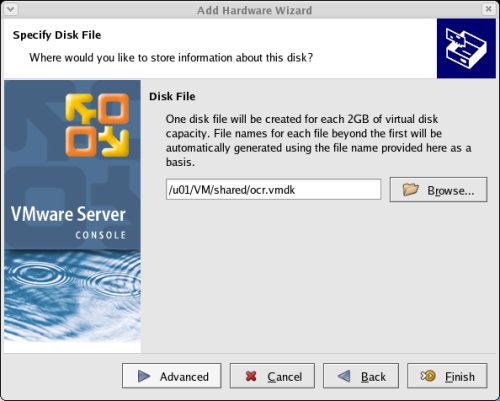
Set the virtual device node to "SCSI 1:1" and the mode to "Independent" and "Persistent", then click the "Finish" button.

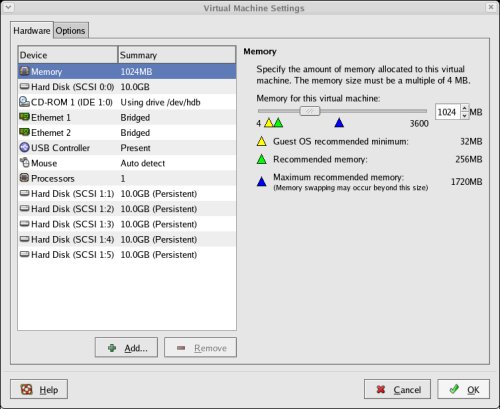
Repeat the previous hard disk creation steps 4 more times, using the following values:
- File Name: /u01/VM/shared/votingdisk.vmdkVirtual Device Node: SCSI 1:2Mode: Independent and Persistent
- File Name: /u01/VM/shared/asm1.vmdkVirtual Device Node: SCSI 1:3Mode: Independent and Persistent
- File Name: /u01/VM/shared/asm2.vmdkVirtual Device Node: SCSI 1:4Mode: Independent and Persistent
- File Name: /u01/VM/shared/asm3.vmdkVirtual Device Node: SCSI 1:5Mode: Independent and Persistent
At the end of this process, the virtual machine should look something like the picture below.
Edit the contents of the "/u01/VM/RAC1/RAC1.vmx" file using a text editor, making sure the following entries are present. Some of the tries will already be present, some will not.
disk.locking = "FALSE"
diskLib.dataCacheMaxSize = "0"
diskLib.dataCacheMaxReadAheadSize = "0"
diskLib.dataCacheMinReadAheadSize = "0"
diskLib.dataCachePageSize = "4096"
diskLib.maxUnsyncedWrites = "0"
scsi1.present = "TRUE"
scsi1.virtualDev = "lsilogic"
scsi1.sharedBus = "VIRTUAL"
scsi1:1.present = "TRUE"
scsi1:1.mode = "independent-persistent"
scsi1:1.fileName = "/u01/VM/shared/ocr.vmdk"
scsi1:1.deviceType = "plainDisk"
scsi1:1.redo = ""
scsi1:2.present = "TRUE"
scsi1:2.mode = "independent-persistent"
scsi1:2.fileName = "/u01/VM/shared/votingdisk.vmdk"
scsi1:2.deviceType = "plainDisk"
scsi1:2.redo = ""
scsi1:3.present = "TRUE"
scsi1:3.mode = "independent-persistent"
scsi1:3.fileName = "/u01/VM/shared/asm1.vmdk"
scsi1:3.deviceType = "plainDisk"
scsi1:3.redo = ""
scsi1:4.present = "TRUE"
scsi1:4.mode = "independent-persistent"
scsi1:4.fileName = "/u01/VM/shared/asm2.vmdk"
scsi1:4.deviceType = "plainDisk"
scsi1:4.redo = ""
scsi1:5.present = "TRUE"
scsi1:5.mode = "independent-persistent"
scsi1:5.fileName = "/u01/VM/shared/asm3.vmdk"
scsi1:5.deviceType = "plainDisk"
scsi1:5.redo = ""
Start the RAC1 virtual machine by clicking the "Power on this virtual machine" button on the VMware Server Console. When the server has started, log in as the root user so you can partition the disks. The current disks can be seen by issueing the following commands.
# cd /dev
# ls sd*
sda sda1 sda2 sdb sdc sdd sde sdf
#
Use the "fdisk" command to partition the disks sdb to sdf. The following output shows the expected fdisk output for the sdb disk.
# fdisk /dev/sdb
Device contains neither a valid DOS partition table, nor Sun, SGI or OSF disklabel
Building a new DOS disklabel. Changes will remain in memory only,
until you decide to write them. After that, of course, the previous
content won't be recoverable.
The number of cylinders for this disk is set to 1305.
There is nothing wrong with that, but this is larger than 1024,
and could in certain setups cause problems with:
1) software that runs at boot time (e.g., old versions of LILO)
2) booting and partitioning software from other OSs
(e.g., DOS FDISK, OS/2 FDISK)
Warning: invalid flag 0x0000 of partition table 4 will be corrected by w(rite)
Command (m for help): n
Command action
e extended
p primary partition (1-4)
p
Partition number (1-4): 1
First cylinder (1-1305, default 1):
Using default value 1
Last cylinder or +size or +sizeM or +sizeK (1-1305, default 1305):
Using default value 1305
Command (m for help): p
Disk /dev/sdb: 10.7 GB, 10737418240 bytes
255 heads, 63 sectors/track, 1305 cylinders
Units = cylinders of 16065 * 512 = 8225280 bytes
Device Boot Start End Blocks Id System
/dev/sdb1 1 1305 10482381 83 Linux
Command (m for help): w
The partition table has been altered!
Calling ioctl() to re-read partition table.
Syncing disks.
#
In each case, the sequence of answers is "n", "p", "1", "Return", "Return", "p" and "w".
Once all the disks are partitioned, the results can be seen by repeating the previous "ls" command.
# cd /dev
# ls sd*
sda sda1 sda2 sdb sdb1 sdc sdc1 sdd sdd1 sde sde1 sdf sdf1
#
Edit the /etc/sysconfig/rawdevices file, adding the following lines.
/dev/raw/raw1 /dev/sdb1
/dev/raw/raw2 /dev/sdc1
/dev/raw/raw3 /dev/sdd1
/dev/raw/raw4 /dev/sde1
/dev/raw/raw5 /dev/sdf1
Restart the rawdevices service using the following command.
service rawdevices restart
Create some symbolic links to the raw devices. This is not really necessary, but it acts as a reminder of the true locatons.
ln -s /dev/raw/raw1 /u01/oradata/ocr
ln -s /dev/raw/raw2 /u01/oradata/votingdisk
ln -s /dev/raw/raw3 /u01/oradata/asm1
ln -s /dev/raw/raw4 /u01/oradata/asm2
ln -s /dev/raw/raw5 /u01/oradata/asm3
Run the following commands and add them the /etc/rc.local file.
chown oracle:oinstall /dev/raw/raw1
chown oracle:oinstall /dev/raw/raw2
chown oracle:oinstall /dev/raw/raw3
chown oracle:oinstall /dev/raw/raw4
chown oracle:oinstall /dev/raw/raw5
chmod 600 /dev/raw/raw1
chmod 600 /dev/raw/raw2
chmod 600 /dev/raw/raw3
chmod 600 /dev/raw/raw4
chmod 600 /dev/raw/raw5
The shared disks are now configured.
Clone the Virtual Machine
The current version of VMware Server does not include an option to clone a virtual machine, but the following steps illustrate how this can be achieved manually.
Shut down the RAC1 virtual machine using the following command.
# shutdown -h now
Copy the RAC1 virtual machine using the following command.
# cp -R /u01/VM/RAC1 /u01/VM/RAC2
Edit the contents of the "/u01/VM/RAC2/RAC1.vmx" file, making the following change.
displayName = "RAC2"
Ignore discrepancies with the file names in the "/u01/VM/RAC2" directory. This does not affect the action of the virtual machine.
In the VMware Server Console, select the File > Open menu options and browse for the "/u01/VM/RAC2/RAC1.vmx" file. Once opened, the RAC2 virtual machine is visible on the console. Start the RAC2 virtual machine by clicking the "Power on this virtual machine" button and click the "Create" button on the subsequent "Question" screen.

Ignore any errors during the server startup. We are expecting the networking components to fail at this point.
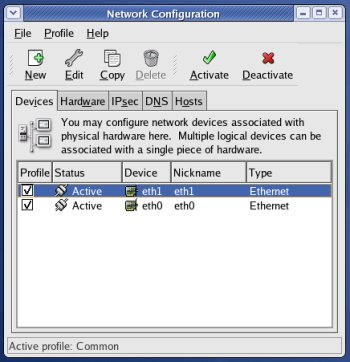
Log in to the RAC2 virtual machine as the root user and start the "Network Configuration" tool (Applications > System Settings > Network).
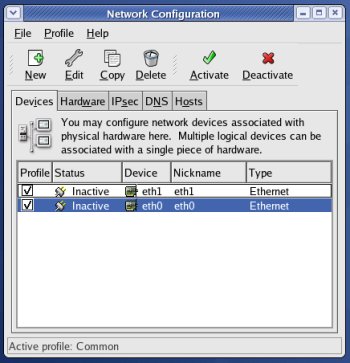
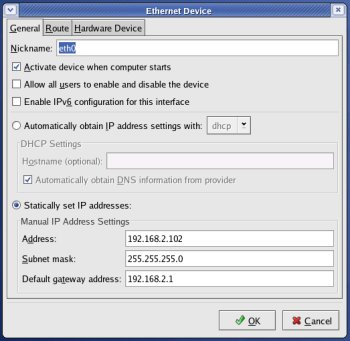
Highlight the "eth0" interface and click the "Edit" button on the toolbar and alter the IP address to "192.168.2.102" in the resulting screen.
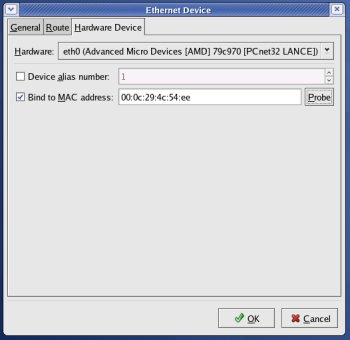
Click on the "Hardware Device" tab and click the "Probe" button. Then accept the changes by clicking the "OK" button.
Repeat the process for the "eth1" interface, this time setting the IP Address to "192.168.0.102".
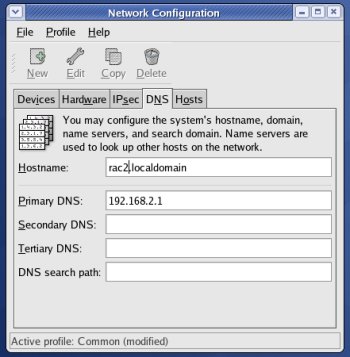
Click on the "DNS" tab and change the host name to "rac2.localdomain", then click on the "Devices" tab.
Once you are finished, save the changes (File > Save) and activate the network interfaces by highlighting them and clicking the "Activate" button. Once activated, the screen should look like the following image.
Edit the /home/oracle/.bash_profile file on the RAC2 node to correct the ORACLE_SID value.
ORACLE_SID=RAC2; export ORACLE_SID
Start the RAC1 virtual machine and restart the RAC2 virtual machine. Whilst starting up, the "Kudzu" detection screen may be displayed.
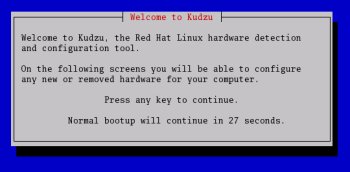
Press a key and accept the configuration change on the following screen.
When both nodes have started, check they can both ping all the public and private IP addresses using the following commands.
ping -c 3 rac1
ping -c 3 rac1-priv
ping -c 3 rac2
ping -c 3 rac2-priv
At this point the virtual IP addresses defined in the /etc/hosts file will not work, so don't bother testing them.
Note. In the original installation I used RSH for inter-node communication. If you wish to use SSH instead, perform the following configurations. If you prefer to use RSH, jump straight to the runcluvfy.sh note.
Configure SSH on each node in the cluster. Log in as the "oracle" user and perform the following tasks on each node.
su - oracle
mkdir ~/.ssh
chmod 700 ~/.ssh
/usr/bin/ssh-keygen -t rsa # Accept the default settings.
The RSA public key is written to the ~/.ssh/id_rsa.pub file and the private key to the ~/.ssh/id_rsa file.
Log in as the "oracle" user on RAC1, generate an "authorized_keys" file on RAC1 and copy it to RAC2 using the following commands.
su - oracle
cd ~/.ssh
cat id_rsa.pub >> authorized_keys
scp authorized_keys rac2:/home/oracle/.ssh/
Next, log in as the "oracle" user on RAC2 and perform the following commands.
su - oracle
cd ~/.ssh
cat id_rsa.pub >> authorized_keys
scp authorized_keys rac1:/home/oracle/.ssh/
The "authorized_keys" file on both servers now contains the public keys generated on all RAC nodes.
To enable SSH user equivalency on the cluster member nodes issue the following commands on each node.
ssh rac1 date
ssh rac2 date
ssh rac1.localdomain date
ssh rac2.localdomain date
exec /usr/bin/ssh-agent $SHELL
/usr/bin/ssh-add
You should now be able to SSH and SCP between servers without entering passwords.
Before installing the clusterware, check the prerequisites have been met using the "runcluvfy.sh" utility in the clusterware root directory.
/mountpoint/clusterware/runcluvfy.sh stage -pre crsinst -n rac1,rac2 -verbose
If you get any failures be sure to correct them before proceeding.
It's a good idea to take a snapshot of the virtual machines, so you can repeat the following stages if you run into any problems. To do this, shutdown both virtual machines and issue the following commands.
# cd /u01/VM
# tar -cvf RAC-PreClusterware.tar RAC1 RAC2 shared
# gzip RAC-PreClusterware.tar
The virtual machine setup is now complete.
Install the Clusterware Software
Start the RAC1 and RAC2 virtual machines, login to RAC1 as the oracle user and start the Oracle installer.
./runInstaller
On the "Welcome" screen, click the "Next" button.

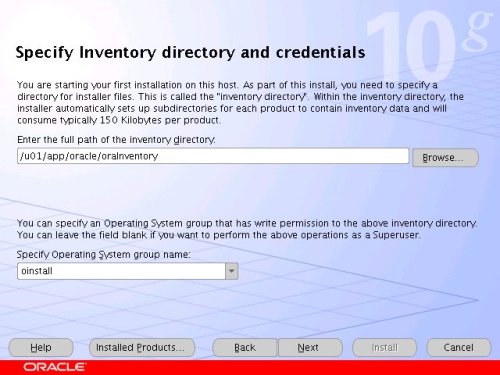
Accept the default inventory location by clicking the "Next" button.
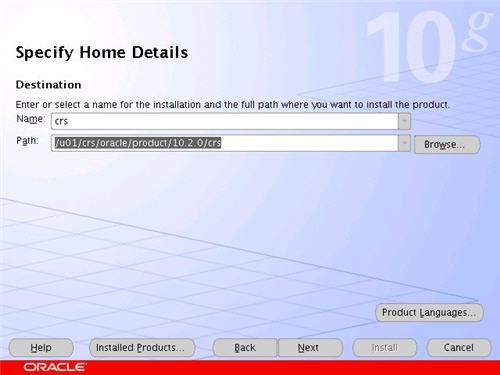
Enter the appropriate name and path for the Oracle Home and click the "Next" button.
Wait while the prerequisite checks are done. If you have any failures correct them and retry the tests before clicking the "Next" button.
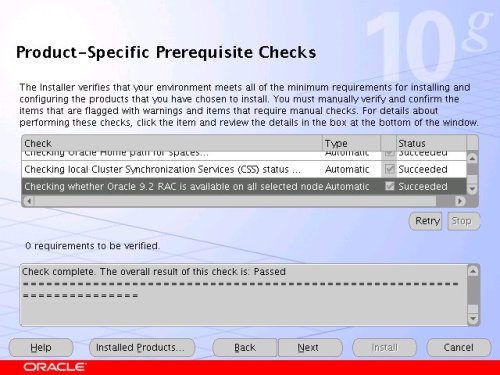
You can choose to ignore the warnings from the prerequisite checks and click the "Next" button. If you do, you will also need to ignore the subsequent warning message by clicking the "Yes" button.

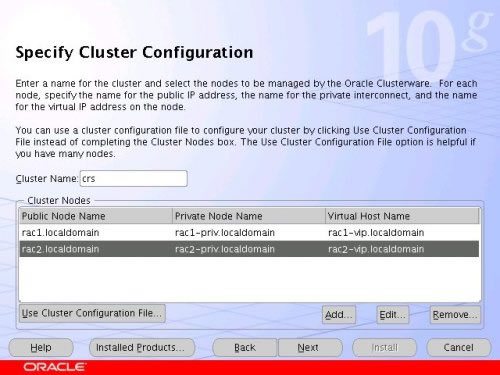
The "Specify Cluster Configuration" screen shows only the RAC1 node in the cluster. Click the "Add" button to continue.
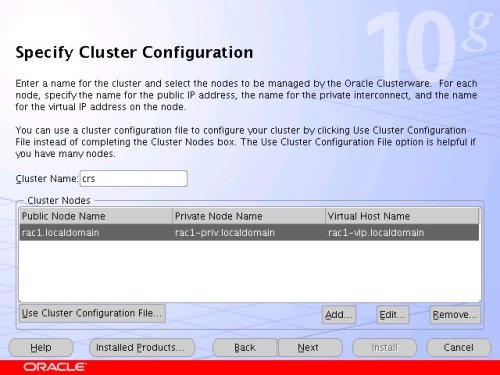
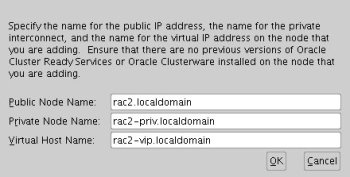
Enter the details for the RAC2 node and click the "OK" button.
Click the "Next" button to continue.
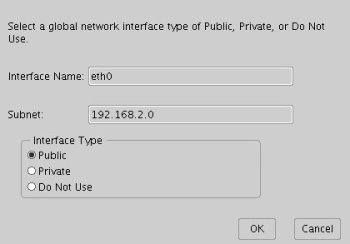
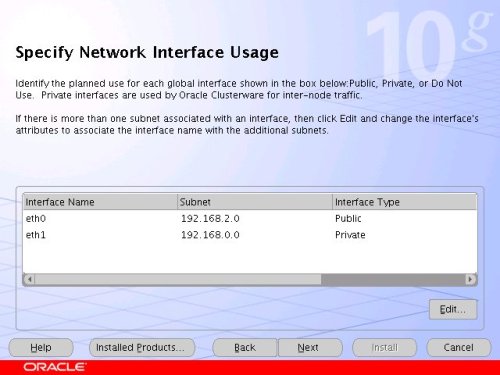
The "Specific Network Interface Usage" screen defines how each network interface will be used. Highlight the "eth0" interface and click the "Edit" button.
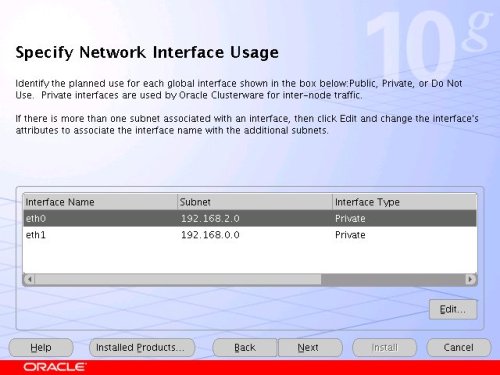
Set the "eht0" interface type to "Public" and click the "OK" button.
Leave the "eth1" interface as private and click the "Next" button.
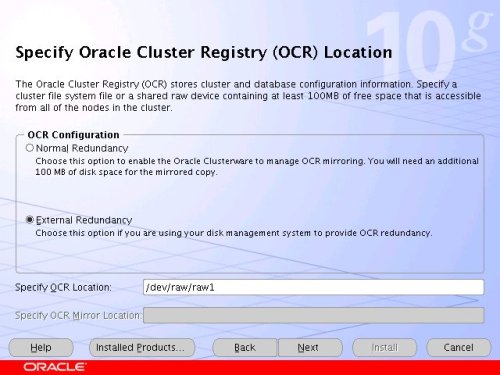
Click the "External Redundancy" option, enter "/dev/raw/raw1" as the OCR Location and click the "Next" button. To have greater redundancy we would need to define another shared disk for an alternate location.
Click the "External Redundancy" option, enter "/dev/raw/raw2" as the Voting Disk Location and click the "Next" button. To have greater redundancy we would need to define another shared disk for an alternate location.

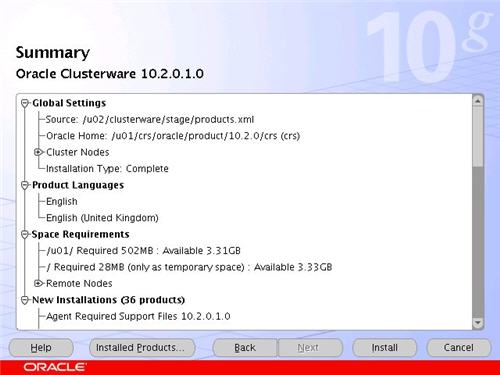
On the "Summary" screen, click the "Install" button to continue.
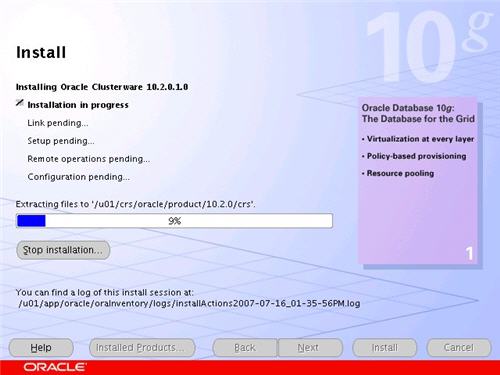
Wait while the installation takes place.
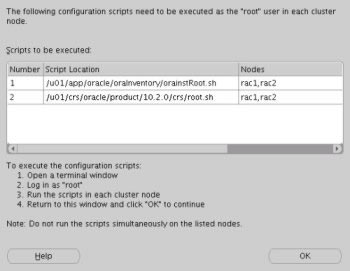
Once the install is complete, run the orainstRoot.sh and root.sh scripts on both nodes as directed on the following screen.
The output from the orainstRoot.sh file should look something like that listed below.
# cd /u01/app/oracle/oraInventory
# ./orainstRoot.sh
Changing permissions of /u01/app/oracle/oraInventory to 770.
Changing groupname of /u01/app/oracle/oraInventory to oinstall.
The execution of the script is complete
#
The output of the root.sh will vary a little depending on the node it is run on. The following text is the output from the RAC1 node.
# cd /u01/crs/oracle/product/10.2.0/crs
# ./root.sh
WARNING: directory '/u01/crs/oracle/product/10.2.0' is not owned by root
WARNING: directory '/u01/crs/oracle/product' is not owned by root
WARNING: directory '/u01/crs/oracle' is not owned by root
WARNING: directory '/u01/crs' is not owned by root
WARNING: directory '/u01' is not owned by root
Checking to see if Oracle CRS stack is already configured
/etc/oracle does not exist. Creating it now.
Setting the permissions on OCR backup directory
Setting up NS directories
Oracle Cluster Registry configuration upgraded successfully
WARNING: directory '/u01/crs/oracle/product/10.2.0' is not owned by root
WARNING: directory '/u01/crs/oracle/product' is not owned by root
WARNING: directory '/u01/crs/oracle' is not owned by root
WARNING: directory '/u01/crs' is not owned by root
WARNING: directory '/u01' is not owned by root
assigning default hostname rac1 for node 1.
assigning default hostname rac2 for node 2.
Successfully accumulated necessary OCR keys.
Using ports: CSS=49895 CRS=49896 EVMC=49898 and EVMR=49897.
node <nodenumber>: <nodename> <private interconnect name> <hostname>
node 1: rac1 rac1-priv rac1
node 2: rac2 rac2-priv rac2
Creating OCR keys for user 'root', privgrp 'root'..
Operation successful.
Now formatting voting device: /dev/raw/raw2
Format of 1 voting devices complete.
Startup will be queued to init within 90 seconds.
Adding daemons to inittab
Expecting the CRS daemons to be up within 600 seconds.
CSS is active on these nodes.
rac1
CSS is inactive on these nodes.
rac2
Local node checking complete.
Run root.sh on remaining nodes to start CRS daemons.
#
Ignore the directory ownership warnings. We should really use a separate directory structure for the clusterware so it can be owned by the root user, but it has little effect on the finished results.
The output from the RAC2 node is listed below.
# cd /u01/crs/oracle/product/10.2.0/crs
# ./root.sh
WARNING: directory '/u01/crs/oracle/product/10.2.0' is not owned by root
WARNING: directory '/u01/crs/oracle/product' is not owned by root
WARNING: directory '/u01/crs/oracle' is not owned by root
WARNING: directory '/u01/crs' is not owned by root
WARNING: directory '/u01' is not owned by root
Checking to see if Oracle CRS stack is already configured
/etc/oracle does not exist. Creating it now.
Setting the permissions on OCR backup directory
Setting up NS directories
Oracle Cluster Registry configuration upgraded successfully
WARNING: directory '/u01/crs/oracle/product/10.2.0' is not owned by root
WARNING: directory '/u01/crs/oracle/product' is not owned by root
WARNING: directory '/u01/crs/oracle' is not owned by root
WARNING: directory '/u01/crs' is not owned by root
WARNING: directory '/u01' is not owned by root
clscfg: EXISTING configuration version 3 detected.
clscfg: version 3 is 10G Release 2.
assigning default hostname rac1 for node 1.
assigning default hostname rac2 for node 2.
Successfully accumulated necessary OCR keys.
Using ports: CSS=49895 CRS=49896 EVMC=49898 and EVMR=49897.
node <nodenumber>: <nodename> <private interconnect name> <hostname>
node 1: rac1 rac1-priv rac1
node 2: rac2 rac2-priv rac2
clscfg: Arguments check out successfully.
NO KEYS WERE WRITTEN. Supply -force parameter to override.
-force is destructive and will destroy any previous cluster
configuration.
Oracle Cluster Registry for cluster has already been initialized
Startup will be queued to init within 90 seconds.
Adding daemons to inittab
Expecting the CRS daemons to be up within 600 seconds.
CSS is active on these nodes.
rac1
rac2
CSS is active on all nodes.
Waiting for the Oracle CRSD and EVMD to start
Waiting for the Oracle CRSD and EVMD to start
Waiting for the Oracle CRSD and EVMD to start
Waiting for the Oracle CRSD and EVMD to start
Waiting for the Oracle CRSD and EVMD to start
Waiting for the Oracle CRSD and EVMD to start
Waiting for the Oracle CRSD and EVMD to start
Oracle CRS stack installed and running under init(1M)
Running vipca(silent) for configuring nodeapps
The given interface(s), "eth0" is not public. Public interfaces should be used to configure virtual IPs.
#
Here you can see that some of the configuration steps are omitted as they were done by the first node. In addition, the final part of the script ran the Virtual IP Configuration Assistant (VIPCA) in silent mode, but it failed. This is because my public IP addresses are actually within the "192.168.255.255" range which is a private IP range. If you were using "legal" IP addresses you would not see this and you could ignore the following VIPCA steps.
Run the VIPCA manually as the root user on the RAC2 node using the following command.
# cd /u01/crs/oracle/product/10.2.0/crs/bin
# ./vipca
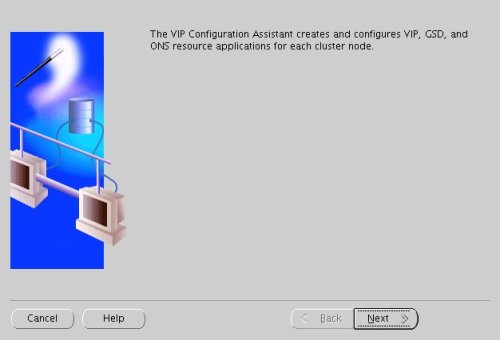
Click the "Next" button on the VIPCA welcome screen.
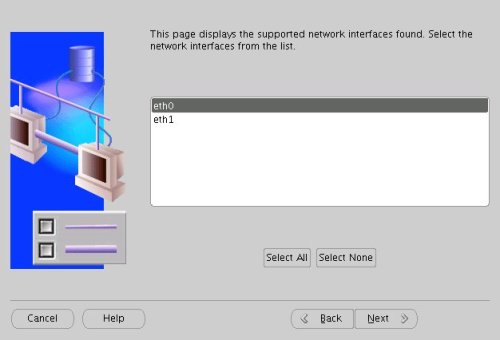
Highlight the "eth0" interface and click the "Next" button.
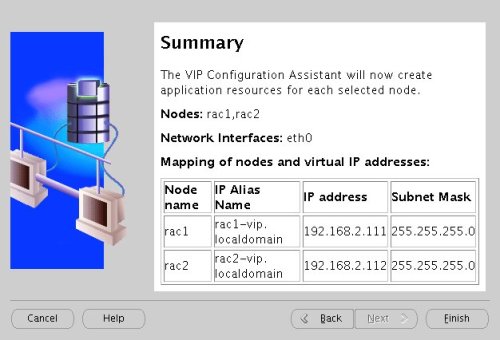
Enter the vitual IP alias and address for each node. Once you enter the first alias, the remaining values should default automatically. Click the "Next" button to continue.

Accept the summary information by clicking the "Finish" button.
Wait until the configuration is complete, then click the "OK" button.
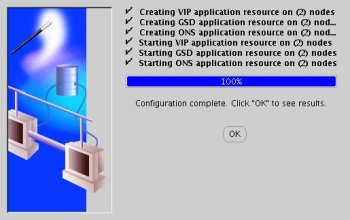
Accept the VIPCA results by clicking the "Exit" button.

You should now return to the "Execute Configuration Scripts" screen on RAC1 and click the "OK" button.
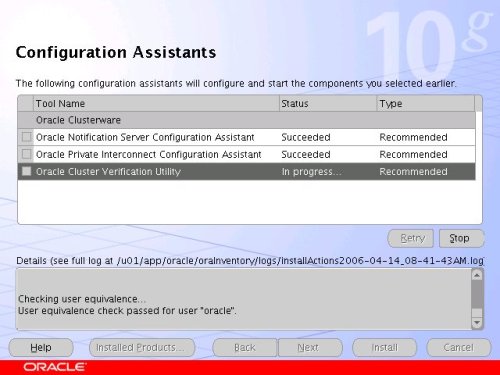
Wait for the configuration assistants to complete.
When the installation is complete, click the "Exit" button to leave the installer.

It's a good idea to take a snapshot of the virtual machines, so you can repeat the following stages if you run into any problems. To do this, shutdown both virtual machines and issue the following commands.
# cd /u01/VM
# tar -cvf RAC-PostClusterware.tar RAC1 RAC2 shared
# gzip RAC-PostClusterware.tar
The clusterware installation is now complete.
 发起投票
发起投票

 技术讨论
技术讨论


 加好友
加好友 发消息
发消息 2011-8-1 11:01:49 |
 赞(
赞( 操作
操作